


ver
the years I have, apart from going
on about my stockings, nails and
heels, mentioned more than once my frustration about having my Stash in
boxes in the cellar.
If you are new here, or would like to refresh a six year ago read, I recommend a quick detour to my last post on this subject (Her Stash and Me).
[Ed: I’ve just gone through it again to make sure you don’t repeat or contradict yourself too much.]
Should I also read it again?
[Ed: Why?]
Good point..
The Dream I
Ever
since I started to buy online I have dreamed of having a wardrobe just
for my girl clothes and to be able to line up in a row my heel
collection without them being cooped up in cardboard shoe boxes all the
time. I think the dream was triggered not only from the frustration of
not having my clothes easier accessible and with everything that could
get creased being creased in boxes, but also after seeing pictures of
walk-in wardrobes and wall to wall high heels.
[Ed: Note. This is not Madam's collection.]
No unfortunately, although when I saw this I must admit I went all funny
inside. It didn't last long knowing full well that I wouldn't be able
to get any of them on with the size of my feet (9UK/43UK/9.5US), even if
I had the opportunity to try.
Okay the wardrobe would not be totally box free. There would have to be
transparent containers used for the rest, like makeup, wigs, shape ware
and the other accessories to make one presentable.
The idea to just be able to open a door and see all my dresses, skirts,
blouses and heels in one go seemed to be so far away for so long.
Well the dream came one step nearer to reality in Summer20.
But before I talk about that a mention of my Stash Storage Logistics (SSL) up to that point.
 [Ed: SSL!]
Bear with me a while.
[Ed: I take it that it is Madam’s want to partake of Tea?]
Excellent suggestion! That is something I could have thought of.
[Ed: Any particular Mug?]
Go by the title of the post.
[Ed: As Madam wishes.
I will select something appropriate for the occasion.]
SSL Level 1
In
the post linked above from Jan16 I mentioned four cardboard boxes plus
two blue plastic containers where I kept my Stash. Well, after I
realised that I would lose my work ‘post box’ following retirement at
the end of that year, I started a long run of panic buying. The result
was that after leaving work there were now eight cardboard boxes plus
the two blue ones to keep undercover.
I did the maths. Just a little over 1.7 cubic meters in Stashables!
The
cardboard boxes were stored on top of a set of Ikea shelving and
therefore not within easy reach without a bit of climbing. As you can
see the shelving is full to capacity, four wide by two deep. Also, the
boxes were a tight fit which made it difficult to grasp when removing.
Some were also quite heavy due to high concentrations of Heels.
[Ed: At lease you didn’t try to get up on the chair in heels.]
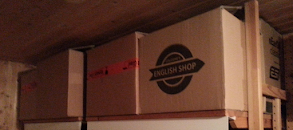
I maybe a little dotty at times, but I’m not that daft!
And yes that is a box from the local English Shop which has now had to
close due to prices going up, extraordinarily long transport delays and
tons of C&E paperwork all because of Brexit.

At
the begin of a session I was pulling out boxes from the shelving
system, bringing them down to either get to the back boxes or open and
search for a garment or heels, then extract if found and close. The box
or boxes would then be left on the floor ready for repacking before
being replaced on the shelving at the end of the session.
The
main problem with everything in boxes was not only the creasing of
fabrics and physical access difficulties, but also, quite literally,
transparency. You couldn’t ad hoc see what was stored where.
Sometimes
I would realise I had very little time to repack and would just do a
'panic pack' disregarding from which box I had extracted what.
Also I
complicated it further by not replacing the unlabelled boxes back on
the shelve at the same location. This sort of randomised any
patterns/locations I might have remembered which meant by the next
session …
I think you get my drift.
Apart from the exercise, all in all, a somewhat frustrating experience.
Accessibility was easier with the two blue containers which were stored
among other similar blue containers full of electronic stuff, kites,
train set, telescopes, drones etc.
Here the advantage was that in the
cellar content in general was stored chaotically in similar blue
containers and in random places around the room,
- a sort of controlled cluttering.
The
strategy behind keeping it this way was, if you want to hide a tree put
it in a forest. Over the years it proved to be a workable solution and
detecting-deterrent.
In the above mentioned post I also went on
about my first attempts at listing and indexing my Stash. Well with
these lists I knew, theoretically at least, where everything was..
[Ed: Unless you had a panic pack attack.]
Which
was, I have to say, most of the time. Hence my use of the word
'theoretically'. One loses all sense of time when one is in a parallel
world..
Heels, which are about half the bulk of my Stash, also lead to
further delays in dressing. The heels that came in their original boxes
were easy identifiable. But with heels from e.g. New Look, they arrived
at work in thick plastic bags. One time I found a package on my desk
with stiletto heels poking through the plastic! The yellow heels in the
picture below.
Fortunately nobody said anything, they may have had thoughts about it, but nothing was said.
SSL Level 2
Following
a few frustrated aborted sessions I decided to try another approach.
The frustration was due to still relatively long search times caused by
having to move around an increasing number of boxes per session. This
was mainly because I couldn’t decide what to wear!
I got the idea to organise everything as far as possible by colour.

All whites together tops, dresses, heels etc.
Shape-ware, makeup and wigs etc. being stored in separate dedicated boxes.
Reorganisation and indexing was more elaborate than before and therefore
took more time than just filling a box and starting a new one when the
other one was full. But in the end it was an improvement when in search
and pick mode. I had, let’s say, ‘optimised the dress work flow’.
If
I decided on a mint outfit then as starters dresses, heels and
accessories were together in the Mint Box. For the majority of colours
there was no need to split a colour between two boxes. Odd colours ended
up where there was space. For black however I used the two blue
containers. The blue container covers were transparent, which wasn’t a
problem as the content was all black and without close scrutiny
undefinable.
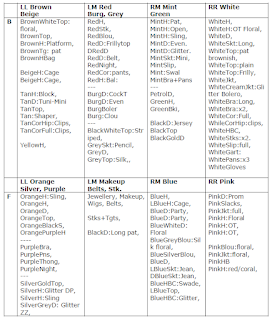
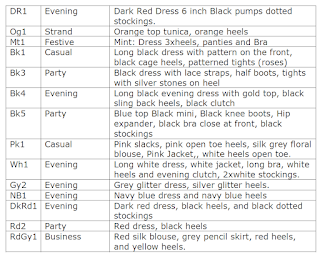
Here we have in my shorthand the contents of the eight cardboard boxes
and the two blue containers: B=back, F=front, LL=left, LM=left middle,
RM=right middle, RR=Right. Also for the contents: H=heels, D=dress,
Skt=Skirt, Jkt=Jacket etc.
If you want a better look at the lists just click on them.
[Ed: Probably not sure now what everything means after so long.]
Well yes a little cryptic now, but I understood it at the time..
SSL Level 3

 I still had limited space to manoeuvre due to everything being ‘multi-box based’.
And
I also had limited time due to having to make sure I had enough time to
repack in an orderly fashion before Mrs.A would open the front door.
After a while I realised I was usually combining the same clothes and heels and so decided to organise
and store by outfit.
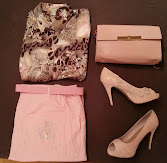
The idea was prompted after starting to pin outfits on my Pinterest page as with the example of the Orange outfit above.
[Ed: Note. This is not Madam's outfit.]
You don't have to rub it in!
The idea of storing per outfit would allowed me to be more flexible in what box an outfit could be stored.
If
I had outfits that I wore more often they would be stored in boxes at
the front, while the rest could be strategically stored at the back.
This also allowed me to think beforehand of an outfit and with the
minimum of box shifting go, at least again theoretically, directly to
the correct box and everything would be in there as a ‘package’.
This last reorganisation took the most part of a weekend while Mrs.A was
away for a seminar. Even with the fun factor it takes time, as all
girls know, on deciding what to match to what.
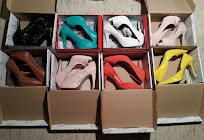
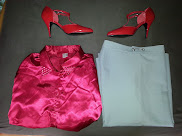
Here are two of the resulting ‘packages’.
Above with red heels, red silk blouse, grey pencil skirt, all packed
together under ’Business’. Grey seamed stockings and matching jewellery
not shown.
And to the right a silk blouse, pink slacks, two pairs of heels (just
could not decide which pair and so packed both) and a pink handbag
primed with of course a compact, pink lipstick and pink earrings.
All packed together under Pk1:‘Casual’.
Pink Jacket listed not shown here.
Even with all this store, search and find optimisation of my Stash, how
much better to just open doors and choose without having to first
consult listings and shift boxes around like in the computer game
Sokoban.
The Dream II
As
said above the dream came one step nearer to reality after Mrs.A
mentioned that it was about time that our guest room was redecorated.
And as we were about it, have a built in wall to wall wardrobe with
sliding doors, a new guest couch/bed and proper lighting. I was fully
decor with this, not only as it was well overdue, but I immediately had
an idea with what I could do with the old four door wardrobe in our
guest room.
She was somewhat sceptical about this as she thought both should be
thrown out. She went on about the wardrobe almost falling apart and the
couch too hard for guests. And why in the cellar? There was hardly any
space down there and if so, where would they be placed etc..
I tacitly left it at that point and we went about making plans for the
renovation. Parallel to this I started a ‘feasibility study’ to see if
my idea for relocation of the wardrobe and couch would work.
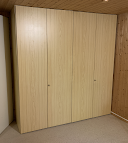
The Wardrobe
As it was an ‘Ikea clone’ type wardrobe it would be easy to dismantle
and modify if needed and rebuild two floors down. I measured the
wardrobe as it was and the place where I wanted it. The width of the
wardrobe was two metres. The space behind the cellar door two metres and
one cm! A close call but it would fit, so I thought at first.
Also no real problem with the couch, although there was only a ten centimetre margin where I wanted to place it.
Looking at the wardrobe upstairs there was plenty of head room above it.
What I had forgotten is that the cellar ceiling was way lower than the
other rooms in the house. The wardrobe was, after measuring the height
of the cellar, three centimetres too high.
This would mean, so I thought, some modifications by taking off three
centimetres from the doors and walls after dismantling and before the
rebuild.
Well it was a little more complicated than that.

My main reason to recycle this particular wardrobe was not only it was
there in the house but because the doors were also lockable! Not your
heavy duty padlock, just a simple one so the doors would stay closed and
didn’t fly open as one went by.
The cellar is also my music studio not just my boudoir. Having the
addition of a bed/couch it would also become a potential place to have
an overnight guest. It would be a big advantage (if not a necessity) to
be able to lock and remove the keys so as to stop anyone, especially
younger members of our family, from taking a causal look when alone down
there for whatever reason.
If I cannot stop myself taking a peek
into a colleague's parents wardrobe while staying the night I can't
expect others not to do the same (see The Wardrobe).
I didn’t really fancy doing any woodwork on the doors or locks and so I
searched in the Net for a wardrobe where I wouldn’t need to do any form
of modification. Well no such luck.
I found out that wardrobes are
not usually made for cellars and come in general at a standard height
and would therefore not fit without modifications. Also I couldn’t find
anything lockable whatever size.
So I had no choice but to be prepared to do a bit of carpentry and to
work out how to modify the simple locking mechanism so it would still
function.
Over the months up to the renovation Mrs.A got round to letting me have
my way. It turn out that at least keeping the couch was a good idea. Due
to the heat waves of the previous two summers she thought about going
down here to read and relax on the couch while I gave her some
background music.

I started to fine tune my reorganisation plan. What was to go where and
what had to be got rid of. A friend gladly took the IKEA shelving as I
would not be needing it; only the space it took up. I temporarily
rearranged the Stash boxes to the other end of the room and covered them
with a blanket, hopefully out of sight and out of mind.
On the first day of the renovation our carpenters were a little
surprised that instead of having only to dismantle a wardrobe and couch
and take them outside to be disposed of, they were instead diverted to
the cellar and asked to rebuild them.
I told them about my idea of shortening the doors and the locking
mechanism. They listened and nodded at all the right moments and when I
had left they just took three centimetres off the base pedestal on which
the wardrobe stood leaving the doors and walls intact!
It turned out to be a perfect fit!
I had now, I thought, plenty of room to store all of my Stash. With two
meters of hanging rail I could have hung almost double the amount of
‘hangables’. And with 2x2 meters of shelving I could just about line up
all my heels.
Well over the following weeks while the renovations
were in full swing upstairs, I spent time noting what was in each of the
boxes scattered around the cellar and where the contents should go.
It slowly dawned on me that apart from my Stash I had also to ‘stash’
non Abi stuff. I also realised Mrs.A would quite likely want to see how I
had put the wardrobe to use and not just be content that she didn't
have to slalom through the room trying not to fall over boxes to get to
the back door.
The consequence was I would have to be able, in the presence of
Mrs.A/family members/friends, to open at least one side of the wardrobe
without letting the cat out of the bag. This, I realised meant I could
only use one side for my wardrobe and the other side for other things.

With this in mind my first task was to see if I could store all the
Stash boxes as well as the other stuff in the wardrobe and close the
doors. I didn’t expect the need to hire a subway pusher but I really
wasn’t sure it I would get everything in.
It was a sort of pack and pray volume test.
I removed the shelving and rails and every now and then when I had
‘cellar time’ I would move boxes and stack them in the wardrobe.
Well it didn’t take long to realise that I could not store all my Stash
boxes in the right hand side of the wardrobe. There were still a few
boxes that would have to be stored on the left hand side. The next task
was to see if by empting the boxes I would have more flexibility to
optimise the storage on the right, e.g. hanging up my clothes and
storing heels boxes on the shelves.
There was a time slot coming up where Mrs.A would be away for three
hours. I would use this to remove all Abi boxes from the wardrobe,
extract hangables and see if I could squeeze them all lined up on the
rail.  Luckily
for some time beforehand I had started to acquire appropriate coat
hangers for each dress and blouse. They sort of just disappeared slowly
over time from the wardrobes upstairs. I had to make sure I acquired
clothes hangers with hooks and lashes appropriate for hanging up dresses
with e.g. spaghetti straps. This was another learning curve as I now
had at last the opportunity to hang them up!
Luckily
for some time beforehand I had started to acquire appropriate coat
hangers for each dress and blouse. They sort of just disappeared slowly
over time from the wardrobes upstairs. I had to make sure I acquired
clothes hangers with hooks and lashes appropriate for hanging up dresses
with e.g. spaghetti straps. This was another learning curve as I now
had at last the opportunity to hang them up!
Well after getting everything up on the rail I could see that I still
had enough room to be able to stack on one side transparent containers
for makeup, wigs, stockings, and shape ware, etc. all the way up to the
rail. The extracting and hanging process took time and I must admit
while doing this it was somewhat surreal realising that all this was
mine. All the different fabrics, textures and colours was quite
overpowering.
I don’t think I was so happy for a long time.
As I
had come this far it was either pack everything back into the boxes and
pack the boxes back into the wardrobe or try and store the heel boxes
above the rail on the two shelves. Looking at the clock I decided to
carry on and not go back.

Less than half of my heel collection in their boxes fitted into the
right half of the wardrobe and I had to use both shelves in the left
half for the rest.
Luckily most of the heel (ex-envelope) boxes were
nondescript with no markings or labels indicating what was in them. I'm
glad I forgot to do that.
I made sure that the original boxed heels remained at the back and the plain ones at the front.
Was I relieved as I started to flatten out the eight large Stash cardboard boxes.
I never thought I would get so far..
Well my dream become at last a reality.
My wardrobe was now in a wardrobe!
I can now at least open and look at the contents even though I have no
real chance to wear what I see at the moment and in future there is all
probability that Mrs.A's out-of-house hobbies will end and she will be
home 24/7. A slight shift in the nature of my frustration, but on the
whole I’m very happy with the results of a dream come true.
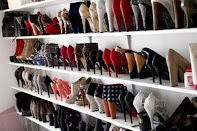
Earlier this year I decided to see how many pairs of heels I could line
up on the two shelves. It turned out I could place ten pairs per shelf.
That is over half of my collection which is better than I thought. It’s a
shame but the rest must stay boxed on the left.
At least now when working in the cellar I can quickly select a pair to wear while there. Hey, that rhymes!
As
the two shelves are 50cm deep I could place one heel at the back at a
slight angle and the other slightly overlapping so the heel of the
second one was positioned just at the edge of the shelf.
The angle makes them quite presentable.
[Ed: Presentable? To whom!?]
To
me! You don't count! I doubt if anyone else will see them live. Unless
I forget to remove the key when we have visitors. I can't remove the
key all the time otherwise Mrs.A may ask the silly question
"Where is the second key? Have you lost it?"
My answer would be "No!" Then there would come..
"Then why don't you leave it in the lock? Then you know where it is!"
As you can imagine I don't want to go down that road..
The consequence is I leave it in most of the time. If she wants to
have a look inside there is nothing to stop her. Maybe she has had a
look, I just have no idea.
[Ed: You're becoming paranoid.]
Don't we know it..
Thinking about it, I need to order the heels a bit differently.
Maybe by colour or height or type or maybe ….
[Ed: Amadán!]
?
Woops! Almost forgot. Yes of course silly me.
Rambling on about the contents and not a dress or heel in sight!
I
could have just added the pictures here but I thought I would give the
contents of the wardrobe its own page as with my Heel Collection.
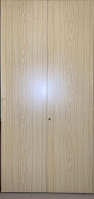
Maybe dear reader you have already cottoned on and are taking a look.
If not please just click on the wardrobe doors here on the right. →


No comments:
Post a Comment